NASCAR 25 Garage Settings: Every Adjustment Explained
NASCAR 25 garage settings look intimidating because one screen can change five things at each tire before you even reach the adjustments for the whole car. Fortunately, every setting has a job. Once you connect each adjustment to entry, center, exit, grip, or stability, the garage becomes far easier to understand.
Also see:
▶ Our complete NASCAR 25 setup guide
▶ Our Team Conti NASCAR 25 setup overview
▶ NASCAR: Steve Letarte explains the garage
This guide explains what the major adjustments do. It does not prescribe one set of values for every track because those numbers change with the series, track type, driving style, controller settings, and race length.
Spring Rate
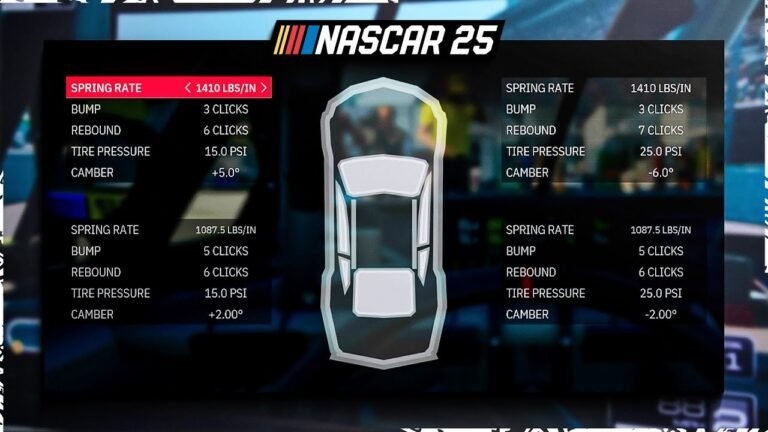
A spring supports one corner of the car and resists compression. A higher rate creates a stiffer spring. A lower rate allows that corner to move more easily.
Former NASCAR crew chief Steve Letarte uses the right-front spring as an example. If the car is tight on entry or through the center, reducing the right-front spring rate can help the front work and improve rotation. That does not mean the softest spring is always fastest. Go too soft and the platform may move excessively or create a new problem elsewhere.
Front spring changes usually have the clearest effect on steering response and center balance. Rear spring changes can influence rear grip, weight transfer, and how the car accepts throttle. Always make small changes because the four corners work together.
Shock Bump
Shock bump controls resistance while the shock compresses. Picture one corner of the car loading as the driver brakes, turns, or hits a bump. More bump resistance slows that compression. Less lets the corner compress more freely.
Bump changes can shape how quickly weight arrives at a tire. That makes them useful for controlling transitions rather than simply labeling the car tighter or looser. If you are new to custom setups, learn springs, sway bars, wedge, and brake bias first. Then use shocks to refine how the car reaches its balance.
Shock Rebound
Rebound controls resistance as the shock extends. Letarte explains this by describing a car that is loose on exit. Reducing front rebound can allow the front to rise more easily as the driver accelerates. That helps weight transfer rearward and can give the back tires more grip.
The key is timing. Rebound influences how the car releases load when you leave the brake or apply throttle. A change that calms exit may also affect the transition into the next phase, so test it over several laps.
Tire Pressure
Tire pressure affects grip, response, heat, and the size and shape of the contact patch. For a beginner, lower pressure can be viewed as a way to seek more grip at that tire. However, it is not a universal rule that lower is always faster.
Pressure builds as the tire heats. A cold setting that feels good immediately may become too high later in the run. Conversely, a pressure that starts low may feel lazy until the tire reaches its working range.
Judge pressure with lap averages, tire behavior, and long-run balance. Do not choose it from one opening lap. Also remember that each tire carries a different workload on an oval, so matching all four pressures is rarely the goal.
Camber
Camber is the angle of the tire relative to the track when viewed from the front. Negative camber tips the top of the tire inward. Positive camber tips it outward.
Oval setups often use different camber directions on the left and right because the car spends the lap turning left. The goal is to place the loaded tire correctly on the track through the corner.
More aggressive camber can improve initial cornering grip, but too much can overwork part of the tire. Letarte warns that a car may feel good immediately and then get worse as the run develops. Camber should be checked with tire wear and long-run consistency, not only the first lap.
Front Sway Bar
The front sway bar controls how much the front resists body roll. A larger or stiffer front bar generally makes the front resist movement and tightens the car. A smaller or softer front bar generally helps the car turn.
This makes the front sway bar a useful center-corner adjustment. If the car refuses to rotate after turn-in, softening the bar may help. If the front reacts too aggressively and the car feels nervous, more bar may add security.
Sway-bar changes also alter how the two front tires share load. Avoid large jumps unless the baseline is far away.
Rear Sway Bar
The rear sway bar changes roll resistance at the back of the car. A larger rear bar generally helps the car rotate and makes the rear freer. A smaller rear bar makes the rear more secure and the overall balance tighter.
NASCAR 25 may allow the rear bar to be reduced to zero on some combinations. Letarte notes that removing it can make the car very tight. He prefers using a rear bar when direction change is important, but the best choice still depends on the track and the driver’s tolerance for rear movement.
Wheel Lock
Wheel lock controls how far the front tires can turn. Increase it when the steering cannot provide enough angle for a tight corner. Decrease it when the front feels overly sensitive for the required steering inputs.
Wheel lock does not manufacture front grip. If the tires are already sliding, turning them farther can make the problem worse. Use it to match steering range to the track after the basic balance is close.
Brake Bias
Brake bias determines how much braking force goes to the front versus the rear. A displayed value above 50 percent sends more braking force forward. Letarte describes roughly 55 to 58 percent as a common region, although the ideal value depends on the car and track.
Move the bias forward when the rear becomes unstable under braking. Move it rearward when the car is too secure and refuses to rotate on entry. Take small steps because excessive rear brake can cause a spin before the driver reaches the center of the corner.
Brake bias matters most where the driver uses the brake heavily. Its effect is smaller at tracks where lifting or drafting matters more than braking zones.
Rear-End Ratio
The rear-end ratio controls the relationship between engine speed and road speed. A shorter ratio improves acceleration but reaches maximum rpm sooner. A taller ratio provides more speed per engine revolution but may reduce acceleration.
Choose the ratio so the engine reaches the useful part of its range near the end of the longest straight without sitting on the limiter too early. Drafting can raise speed, so a superspeedway ratio must account for the extra rpm gained in traffic.
Do not treat gearing as a cure for poor corner exit. A car that spins its rear tires needs grip before it needs a shorter ratio.
Wedge or Cross Weight
Wedge is the total percentage of weight carried by the right-front and left-rear tires. Adding wedge generally tightens the car and improves rear security when power is applied. Removing wedge generally frees the car and helps rotation.
Wedge is one of the clearest NASCAR 25 garage settings because it influences the compromise between center rotation and drive off. Too much can make the car push. Too little can make the rear tires struggle when the driver returns to throttle.
Use wedge after you identify whether the problem is in the center, on exit, or both. If the car is loose only under braking, brake bias may be the cleaner first adjustment.
Left-Side Weight
Left-side weight is the percentage of the car’s total weight carried on the left. NASCAR 25 allows up to 53 percent, reflecting the NASCAR rule Letarte discusses.
For an oval, he recommends maximizing left-side weight because the car only turns left. More left-side weight helps the chassis manage the load generated in left-hand corners.
Road courses require a different approach. Since the car turns both directions, a value closer to 50 percent creates a more balanced platform. Small track-specific changes may still help, but an oval extreme is not the right default.
Nose Weight
Nose weight is the percentage of total weight carried by the front tires. More nose weight makes entry more secure and generally tighter. Less nose weight can help direction change, although it can also make the driver less comfortable while braking and turning in.
This adjustment highlights the core setup tradeoff. A comfortable entry may lead to a tight center. A car that rotates sharply may be harder to catch. Change nose weight with a clear goal and check the full corner before deciding it helped.
Trim
The trim adjustment in NASCAR 25 does not mean aerodynamic trim in the usual television sense. It helps the car run straight down the straightaway.
Use trim when the steering wheel is off-center or the car requires constant input to track straight. Correct trim can reduce unnecessary steering movement and make the driver more precise. It should not be used to cover up a suspension problem that only appears under braking or cornering load.
Start With the Adjustment Closest to the Problem
A tight entry problem points toward front grip, brake bias, or nose weight. A tight center points toward the front springs, front sway bar, wedge, and overall platform. A loose exit points toward rear grip, wedge, rear sway bar, and weight transfer.
That does not mean changing all four at once. Pick the setting most directly connected to the symptom. Make a small adjustment, run a repeatable test, and keep notes.
If the problem moves to another phase of the corner, the first change taught you something. Setup building is a chain of measured compromises, not a hunt for one perfect number.
Test NASCAR 25 Garage Settings Over a Run
Run enough laps to heat the tires. Compare average pace as well as the best lap. A setup that produces one spectacular lap and then falls apart may work for qualifying, but it is not a strong race setup.
Keep separate files for the baseline, qualifying trim, and race trim. Record what changed and how the car responded. That habit prevents you from losing a stable build while chasing another tenth.
Most importantly, tune for the way you drive. Controller sensitivity, assists, wheel settings, braking style, and throttle application all change what feels comfortable. The fastest setup on someone else’s screen is only a starting point on yours.